This User Guide helps you efficiently use the online tool to convert Excel data into Tally XML files. It covers working with different templates, step-by-step instructions, and troubleshooting common issues encountered during import. Please read this guide carefully before you start.
Important Tips –
- Template Names: Use VCHR for Vouchers, LED for Ledgers, and BANK for Bank statements.
- Never rename the downloaded Excel template file as it is required for the tool to function correctly.
- Use the Template Auto Menu button to automatically set DEBIT & CREDIT amounts with the correct minus (-) sign.
- Choose the correct template format based on the type of data you want to convert to XML (e.g., vouchers, ledgers, bank statements).
- Do not modify column headers or formats within the templates to avoid errors.
- Remove any completely empty rows to prevent blank data errors. Press
CTRL + ENDto find the last used row. - Use only the “Delete Rows” or “Delete Columns” feature to remove unwanted data without disturbing the format.
- If your template is corrupted or altered, download a fresh copy from the website.
- Copy and paste data as values only to keep the template formatting intact.
- Create all Masters in Tally before importing voucher data to avoid reference errors.
- Make sure your computer date and Excel date format are set to DD-MM-YYYY to match Tally’s requirements.
How to convert Excel data into Tally XML file?
- Download the latest Excel template for Masters or Vouchers from the website.
- Keep the original file name unchanged to ensure compatibility.
- Fill in your data strictly following the template’s column format and instructions.
- Use the Template Auto Menu button to automatically set minus (-) signs for DEBIT & CREDIT amounts to avoid manual errors.
- Enable Excel Macros to allow the auto features of the template to work properly.
- Remove any empty rows to keep data clean and avoid import issues (use
CTRL + ENDto check). - Upload the completed Excel file on the website and click the GENERATE XML button.
- The tool will process and download a ready-to-import Tally XML file.
- This XML file can now be imported directly into Tally software.
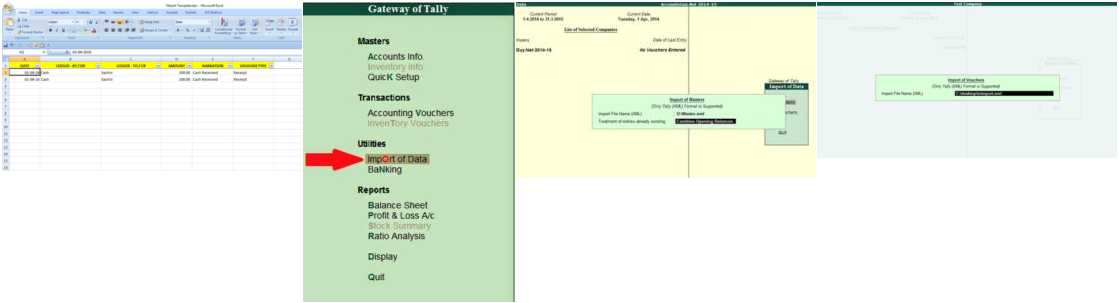
How to import XML file into Tally?
- Open Tally and load the company where you want to import data.
- Navigate to the IMPORT OF DATA menu option within Tally.
- Select the appropriate import type — either Masters or Vouchers — depending on your XML data.
- Enter the full path of your XML file, e.g.,
C:\vch.xml, in the file path input. - Begin the import process; Tally will add the data to the company.
- Always ensure all Masters are imported before importing Vouchers to maintain data integrity.
- If you get errors during import, check the
Tally.implog file to identify the problems. - The
Tally.impfile contains detailed messages about errors or warnings encountered.
Prerequisite Software –
- Use Windows 7 or later operating systems for full compatibility.
- Microsoft Excel 2007 or higher is required to use and edit templates properly.
- Tally software versions supported include Tally 7.2, 8.1, 9, Tally ERP, Tally ERP 9, Tally Prime, or newer versions.
- Google Chrome or Mozilla Firefox are recommended browsers for the online tool.
Training –
- No specialized training is required to use this utility effectively.
- Basic knowledge of Excel and Tally operations will help smooth usage.
- We strongly recommend reading this help guide before starting your work.
- Use the demo videos and images available on the website to better understand the process.
Error: Can’t import? Check Tally.imp file –
- If import errors block the process, you can ignore minor errors to continue.
- Open Tally and go to the GATEWAY OF TALLY screen.
- Press the F12 key and select the GENERAL configuration menu.
- Set Ignore errors during data import to YES to bypass non-critical errors.
Error: No Accounting Allocation –
- This error typically appears if Inventory features are enabled but allocation isn’t set.
- To fix it, open the Ledger Alteration screen in Tally.
- Find and set the option “Inventory values are affected” to YES.
- This setting links ledger accounts properly with inventory for accurate allocation.
Viewing Errors & Details –
- The
Tally.impfile stores detailed error logs for import operations. - Locate this file in the Tally installation directory on your PC.
- Right-click the Tally shortcut and choose Properties.
- Click Open File Location to access the installation folder.
- Look for files ending with the
.impextension and open them with Notepad. - Read the error messages carefully, fix issues in your XML or Excel data, then retry the import.
Tally Prime: How to Check Import Errors & Reports –
- Open Tally Prime and load your company before importing data.
- After import, navigate to Display > Exception Reports to see error summaries.
- Review the Data Synchronization Report to identify any mismatches or conflicts.
- Check the detailed Masters and Voucher Exception reports for specific issues.
- Use these reports to correct errors in your XML or source Excel data files.
- Ensure all Masters are created and error-free before importing voucher data.
- Consult official Tally Prime documentation for advanced troubleshooting if needed.
Screenshot of Typical Error Log